

FlipClips Scout XT Band Installation
Band installation guide.
FlipClip™ Scout XT
Band Installation
This band installation guide covers the installation and banding with the FlipClip X™ on the Scout XT Slingshot.
- * *
- * *
This is the SimpleShot Guide to installing slingshot bands using FlipClips X on the Scout XT. The Scout XT is a fine frame for the wrap and tuck method, but we recommend only using the SimpleShot FlipClips X that came with your slingshot to secure your bands.
The FlipClips method is an ultra-simple slingshot banding process allowing you to quickly and easily change your slingshot bands. Simply loosen up the clip where the installation will be taking place. Make sure that you have enough room to insert the end of the band. Insure that the inside of the pouch is facing up as you place the band in the grove, creating a trough back from the target side of the slingshot, knowing that it will pull over the top of the forks. Once your bands are in place, tighten up the clip finger tight – and finger tight is just fine, you do not need to over tighten because you can damage the bands if you get too tight. Make sure your clips are snug and that your bands have no twists for a proper over-the-top or through-the-forks band configuration with SimpleShot FlipClips.
For added performance, tune your bands by cutting them to match your draw length. If you don't know how to tune your bands, please
check out our tutorial on our website or youtube to make sure your bands are tuned properly.
- * *
Sale Off

Scout XT
$39.99$33.99
Add To Cart
Sale Off

FlipClip X for Scout XT
$11.99$10.19
Add To Cart
Sale Off

Scout XT Thumb Screws for FlipClipsX
$4.99$4.24
Add To Cart
Get to know the FlipClipsX™
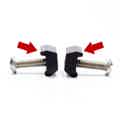
Every FlipClip has a "tooth."
This upper side of the clip is slightly larger and less round. Only use this side to grip the band.

Every FlipClip pair has a left and right component.
****
The logos engraved on each clip will show you which is which!

For TTF configuration:
The logos should be on the TOP with the bands around the sides.

For OTT configuration:
The logos should be on the OUTSIDE with the bands over the top.
Install Bands With Your FlipClipsX™
First, decide whether you will be installing your bands OTT or TTF.
_Don't know which to use? Try both, starting with OTT._
OTT (Over The Top)

Step 1.
Place FlipClip with logos facing OUT and "tooth" edge in the frame groove.

Step 2.
Thread the fastener JUST until it catches.

Step 3.
Place the band into the groove of the frame and under the "tooth" of the FlipClip.

Step 4.
****
Tighten down the fastener. Do NOT over-tighten. The FlipClip is very strong and will hold when just hand tight.
TTF (Through The Forks)

Step 1.
Place FlipClip with logos facing UP and "tooth" edge in the frame groove.

Step 2.
Thread the fastener JUST until it catches.

Step 3.
Place the band into the groove of the frame and under the "tooth" of the FlipClip.

Step 4.
****
Tighten down the fastener. Do NOT over-tighten. The FlipClip is very strong and will hold when just hand tight.
In step 4, Do NOT over-tighten.Be careful to not damage the band material as tighten your FlipClips.